
If you’ve got a houseful of bored people or
just wish you lived someplace snowy, this is the perfect craft. You
can’t very well go skiing on paper snowflakes but they add a nice
wintery touch your house long after the Christmas decorations have been
put away. They are also very addictive to make. Our family can spend
hours cutting these out. This tutorial will help you make very detailed,
extra-fancy snowflakes. Little hands might have trouble with the
details, but older kids and adults will be fine. They are surprisingly
easy and cheap to do. If you think you could never make these, I promise
you’re wrong. They look much harder to make than they are. Give them a
try!

The materials you need to make paper snowflakes couldn’t be simpler:
paper, scissors and a pencil. You can definitely use any kind of paper
but run-of-the-mill printer-type paper is kind of thick and makes it
nearly impossible to get super fine details. The first year I made
snowflakes I only used regular paper and I was thrilled with the
results. But the next year I wanted make them even better; I wanted to
make mine more detailed and elaborate. If you want to make the
prettiest, fanciest snowflakes you’ll need very thin paper and nice
pointy scissors. I prefer tracing paper. It’s quite thin and translucent
and is absolutely lovely if you hang the snowflakes in your windows.
When the sun shines through them they have a soft glow that you don’t
get if you use regular printer paper which is completely opaque. This
brand is my favorite (I bought this pad of 50 sheets at Michaels for $8.
Actually, I had a coupon so it was about $5. Cheap!). Tracing paper is a
lot easier to cut as well. Your hands will be aching after a while when
you cut regular paper. I also recommend some nice sharp-tipped
scissors. These were in the scrapbooking department and cost about $8.

Step One: Take a sheet of paper and fold it in half.
Make a nice sharp crease. The entire time you’re folding your paper the
crease will be closest to you and the loose edges will be further away.

Step Two: Fold the paper in half but only crease the
very bottom. We don’t want it to stay folded; we just want to mark a
halfway point. Open the paper back up so it’s a half-sheet again.

Step Three: Take the lower right side and fold it over, starting at the midpoint where you made your little crease.

Step Four: Fold the lower left corner over and crease.


Step Five: Flip the paper over so it’s on it’s back.

Step Six: Fold the left side over so it’s completely even with the right side and crease it.

You can’t tell in this picture, but you’ll have a paper edge right along that dotted line. This is where you’ll make a cut.
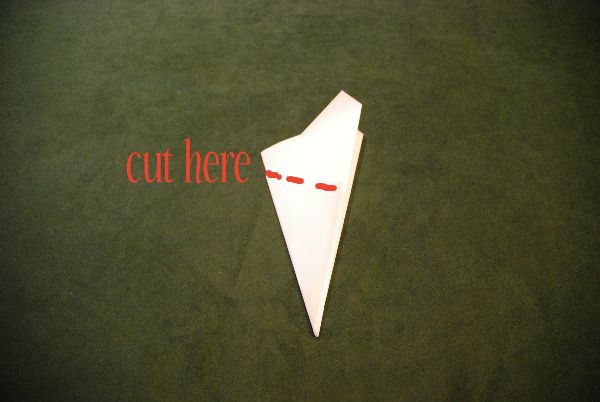

Step Seven: Cut along the slanted edge. The bottom triangular part will be your snowflake. The top bits can be thrown away.


Step Eight: Now is the time to draw on a pattern
with pencil. The idea is to cut away most of the paper. I’ve drawn the
pattern on this snowflake. To make it easier to see I’ve lightly colored
the areas that will be cut away. Only the white parts will remain. This
seems a little daunting and scary but it’s amazing how just about any
design looks wonderful. You might think you need patterns or ideas but
just experiment; you’ll get to be an expert surprisingly fast.

Step nine: Use your nice sharp scissors to carefully cut out your design. An unfolded snowflake is not much to look at.

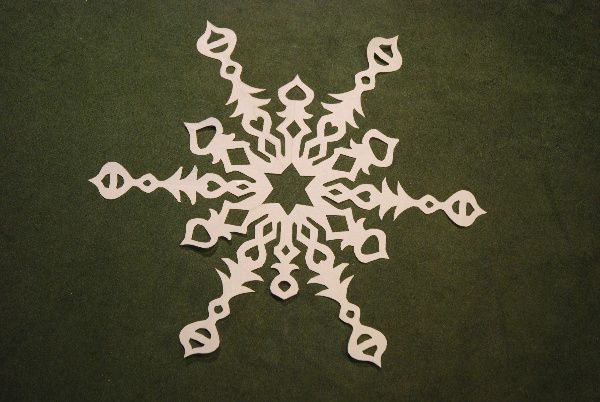
Step Ten: Unfold your snowflake ever so gently. These things rip like the dickens so be careful!

Look how lovely! Prepare to feel an absurd amount of satisfaction. Now if only this snowflake didn’t look so . . . foldy.
Step Eleven: Iron your snowflake. What? Iron
paper?!? Won’t it burst into flames? Not if your iron is on the lowest
setting. If you try to iron your snowflake by itself the iron will get
caught on all the little details and rip your snowflake to pieces. So
we’re going to take two sheets of printer paper and make a snowflake
sandwich. Put one piece of paper on your ironing board, then put the
snowflake on top of it. Top it off with another sheet of plain paper.
Now iron it gently on low heat. It won’t take more than a minute.


Ah, that’s better!

All done! Now go forth and multiply some snowflakes! Here’s a hint
if you’ll be taping them to windows: don’t place the tape on the outer
edges of the snowflake; place the tape inside of the details. It will be
much less obvious. I recommend transparent tape but plain old Scotch
tape is fine.
To get an idea of how snowflake designs translate from folded up to unfolded, here are some examples:


Thanks for stealing my tutorial! How about a link next time!
ReplyDeleteFeel good about yourself by ripping this tutorial off?
ReplyDeletehttp://www.beehiveandbirdsnest.com/2011/12/how-to-make-elaborate-paper-snowflakes.html
is the person who wrote this.
How dare you steal Hildie's tutorial! Such a sad, sad thing to do.
ReplyDelete